When an unknown signal is connected to the oscilloscope, the easiest way to setup the oscilloscope is by using the auto setup function. It will change various settings of the instrument in order to display a signal in a convenient way for the user: stably triggered, with 2 to 6 cycles of the signal captured.
Auto setup can change the following settings:
- sampling frequency will be adjusted in a way that the signal that is the trigger source is displayed with 2 to 6 cycles
- record length will be adjusted in a way that the signal that is the trigger source is displayed with 2 to 6 cycles
- input range of the active channels is modified to obtain optimal signal resolution
- trigger time out is increased in case of slow signals to insure stable triggering
- trigger level of the channel that is used as trigger source is modified to insure stable triggering
- trigger hysteresis of the channel that is used as trigger source is modified to insure stable triggering
Clicking the  Auto setup button located on the instrument toolbar opens the Auto setup window.
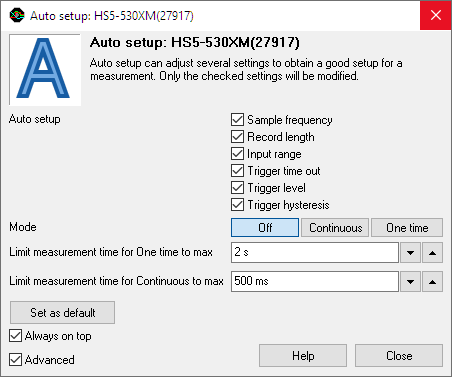
In this window is determined which instrument settings can be adjusted by the software to get to the most useful setup for the connected signal. These setting are derived from the default settings which can be set in the program settings. For this particular measurements these settings can be altered and if required, they can also be set as default.
The Auto setup mode determines how the Auto setup is executed:
- One time the Auto setup is executed once, when the One time button is clicked.
- Continuous the auto setup is executed continuously, to make the required adjustments when the input signal changes.
- Off the Auto setup is switched off
Limit measurement time to max limits the maximum duration of a measurement that is setup by the auto setup function. The One time setting applies to a single Auto setup action, the Continuous setting applies to the continuous Auto setup mode. The setting avoids that the auto setup function will select a very slow setting when the signal is temporarily gone, e.g. when the probe is moved to another point.
Auto setup can also be activated by pressing the hotkey Q (quick auto setup). This activates the One time auto setup without showing the Auto setup window.
The hotkey Ctrl-Q activates the Continuous Auto setup without showing the Auto setup window. Pressing hotkey Q again switches Auto setup off again.