With digital storage oscilloscopes, the record length determines the number of samples that are measured. All these samples can be measured after the trigger has occurred. It is however possible to measure (a part of) the record before the trigger occurs, by selecting pre samples.
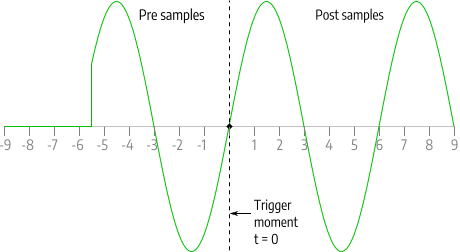
The total record will then be divided in a pre trigger part and a post trigger part, respectively containing pre samples and post samples. This way it is possible to "look back in time" since the pre samples were captured before the trigger moment.
With the TiePie engineering instruments it's possible to define the trigger moment at any position in the record.
Changing the trigger moment in the Multi Channel oscilloscope software can be done in various different ways:
-
By clicking the increase/decrease pre trigger percentage buttons
 and
and
 on the instrument toolbar.
-
Opening the instrument settings dialog using the
 Instrument settings dialog button and selecting the required pre trigger setting in the dialog.
- By using hotkeys Shift + ← and Shift + →.
- By dragging the small triangle on the slider in the horizontal scrollbar under the graph displaying signals from the instrument left or right. The position of the triangle in the scrollbar represents the trigger moment in the measured record.
-
By using the pre samples turning knob
 on the instrument toolbar.
- By right-clicking the horizontal scrollbar under the graph displaying signals from the instrument and selecting Pre trigger and then the appropriate pre trigger percentage in the popup menu.
- By right-clicking the instrument in the Object screen, selecting Pre trigger and then the appropriate pre trigger percentage in the popup menu.