When digitizing the samples, the voltage at each sample time is converted to a number. This is done by comparing the voltage with a number of levels. The resulting number is the number of the highest level that's still lower than the voltage. The number of levels is determined by the resolution. The higher the resolution, the more levels are available and the more accurate the input signal can be reconstructed. In the image below, the same signal is digitized, using three different amounts of levels: 16, 32 and 64.
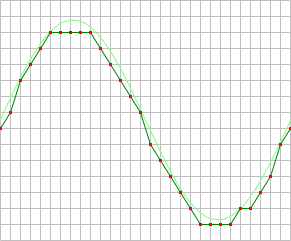
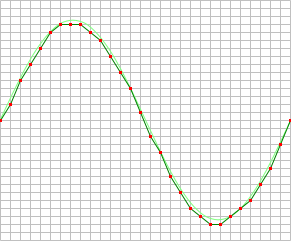
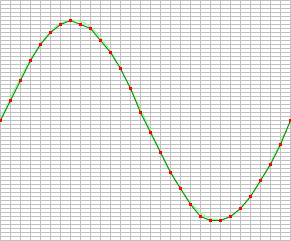
The number of available levels is determined by the resolution:

The used resolutions in the previous image are respectively: 4 bits, 5 bits and 6 bits.
The smallest detectable voltage difference depends on the resolution and the input range. This voltage can be calculated as:

In the 200 mV range, the full scale ranges from -200 mV to +200 mV, the full range is 400 mV. When a 12 bit resolution is used, there are 212 = 4096 levels. This results in a smallest detectable voltage step of 0.400 V / 4096 = 97.7 µV. In 16 bit resolution this step is 0.400 V / 65536 = 6.1 µV
Enhanced resolution
An instrument will have one or more native resolutions, where the resolution is natively present in the Analog to Digital Converter (ADC). Higher resolutions will usually have lower maximum sampling rates.
Additionally, instruments can have one or more enhanced resolutions. These are resolutions that are not present on the ADC, but are created in the instrument using oversampling techniques. As a result of the oversampling technique, the maximum sampling rate at the enhanced resolution is lower.
Resolution mode
As the selected resolution may affect the maximum sample frequency, a resolution mode is available that determines the resolution for the instrument, based on the selected sample frequency. The resolution mode supports the following settings:
- Fixed: the resolution of the oscilloscope is fixed and will not be changed by the software, based on the selected sample frequency.
- Auto non-enhanced: the software sets the resolution of the oscilloscope automatically to the highest possible resolution for the current sample frequency, using only the ADC's native resolutions and not the enhanced resolution(s).
- Auto all: the software sets the resolution of the oscilloscope automatically to the highest possible resolution for the current sample frequency, including enhanced resolution(s).
Controlling the resolution
Changing the resolution of an instrument in the Multi Channel oscilloscope software can be done in various different ways:
-
Opening the instrument settings dialog using the
 Instrument settings dialog button and selecting the required resolution in the dialog.
- Right-clicking the instrument in the Object screen, selecting Resolution and then the appropriate resolution value in the popup menu
-
Clicking the decrease/increase resolution buttons
 and
and
 on the instrument toolbar
-
Clicking the resolution indicator
 on the instrument toolbar and selecting the required resolution from the popup menu