
Typical application: converting sensor values
A typical application of the Gain / Offset I/O is converting sensor output signals. Suppose a pressure sensor has the following characteristic:
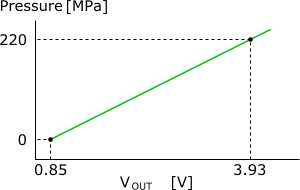
The graph shows that when the pressure is 0 Pa, the output signal equals 0.85 V.
And when the pressure is 220 MPa, the output signal equals 3.93 V.
That gives us two points where a line can be drawn between. The scope does however measure a voltage that needs to be converted to a pressure, so the coordinates of the points we will use in the determination are:
- X1 = 0.85 [in V]
- Y1 = 0 [in Pa]
- X2 = 3.93 [in V]
- Y2 = 220e6 [in Pa]
The equation of a line can be captured in a formula: y = a * x + b, where:
- y is the pressure
- a is the gain
- x is the output voltage
- b is the offset
Gain value a and offset value b are the two unknowns to be determined. The following formulas are used:
![]()
When the actual values are entered, this results in:
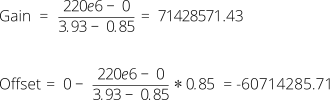
These are the values for the Gain and the Output offset.
Note that the gain can be calculated by the Multi Channel oscilloscope software by entering ( 220e6 - 0 ) / ( 3.93 - 0.85 )
directly in the input dialog.
And the offset can be calculated by the Multi Channel oscilloscope software by entering 0 - (( 220e6 - 0 ) / ( 3.93 - 0.85 )) * 0.85
directly in the input dialog.
Instead of e6, also M can be used.
Set the Unit of the Gain / Offset I/O to 'Pa'.
Properties and actions
To control the behavior of the Gain / Offset I/O, several properties and actions are available.
These can be accessed through a popup menu which is shown when the I/O is right clicked in the Object screen.
The properties can also be accessed through its settings window which is shown when the I/O is double clicked in the Object screen.
To open the Object screen, click the  Show object screen button.
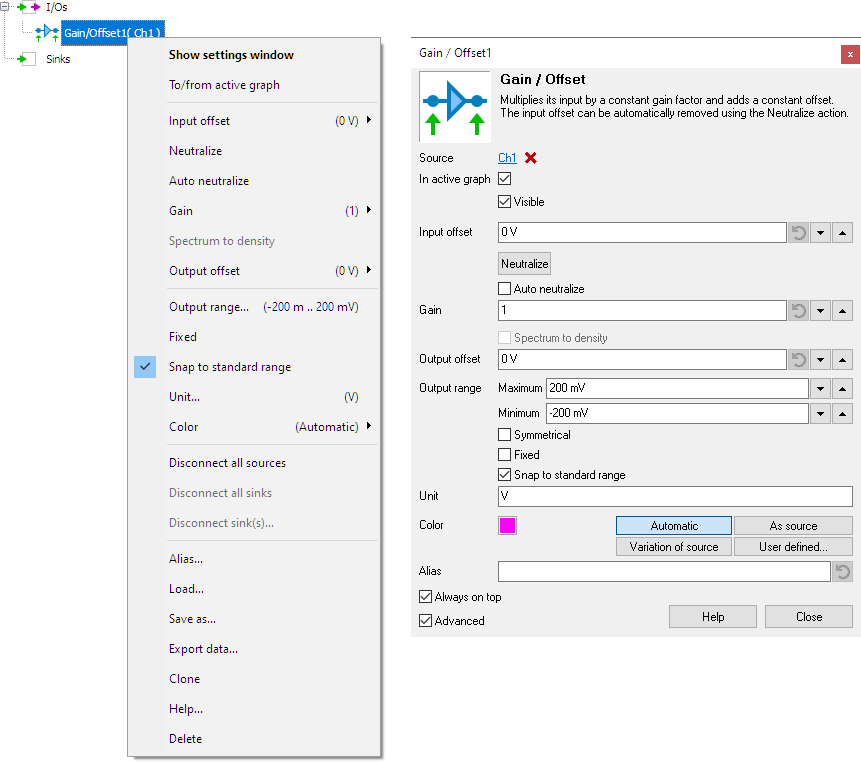
By default, the settings window only shows the most used settings. When Advanced is ticked, the extended window with all settings is shown. See also the program settings.
When the Object Screen is set to schematic presentation, the schematic block for the Gain / Offset I/O shows the values of the Input offset, the Gain and the output offset in the caption. The formula that is show, is Gain * ( Input offset + I ) + Output offset, where I is the input signal.
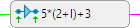
- Input offset = 2
- Gain = 5
- Output offset = 3
Gain
The Gain property determines how much the input signal is multiplied. A value smaller than 1 reduces the signal magnitude. Several default values are available and it is also possible to enter a user defined value.
Input offset
The Input offset is applied to the input signal before the gain is applied. Several default values are available and it is also possible to enter a user defined value.
Neutralize
When an input signal contains an offset, it can be removed automatically by using the Neutralize action. This action uses the current data in the I/O to determine the offset and stores the inverted value in the Input offset property to remove the offset. Each time new data arrives at the Gain / Offset I/O, this determined offset value is used.
Auto neutralize
The Auto neutralize action also removes the offset of data in the Gain / Offset I/O, but it uses the next data that will arrive in the I/O. Once the data has arrived, it will determine the offset and store the inverted value in the Input offset property to remove the offset. The action is then disabled again and each time new data arrives at the Gain / Offset I/O, this determined offset value is used.
This action is useful when a measurement setup with a Gain / Offset I/O that is used to compensate an offset in the signal is saved to disk, in a TPS file. Before saving the TPS file, the Auto neutralize action is enabled and then the TPS file is saved. When the TPS file is loaded again in a later situation, and the first measurement is performed, the auto neutralize action will determine the correct offset value and neutralize it.
Spectrum to density
When the source of the Gain / Offset I/O is a spectrum, you can use the Spectrum to density setting to convert a magnitude spectrum into a density spectrum. For example if the unit of the source spectrum is V, the output unit will become V/Hz.
Output offset
The Output offset is applied to the input signal after the gain is applied. Several default values are available and it is also possible to enter a user defined value.
Common properties and actions
Related information

Add / Subtract
The Add / Subtract I/O adds or subtracts data of two or more sources.
Multiply / Divide
The Multiply / Divide I/O multiplies or divides data of two ore more sources.
Sqrt
The SQRT I/O calculates the square root of each sample of the source's data.
ABS
The ABS I/O takes the absolute value of each sample of the source's data.
Differentiate
The Differentiate I/O differentiates the source's data.
Integrate
The Integrate I/O integrates its source's data.
Logarithm
The Logarithm I/O calculates the logarithm of the source's data.