The oscillocope(s) opened by the Multi Channel oscilloscope software can be controlled in different ways.
One way is to control the oscilloscopes by means of popup menus, opened by right clicking the oscilloscope.
The oscilloscope properties can also be accessed through its settings window which is shown when the scope is
double clicked or the
 Settings window button on the instrument toolbar is clicked.
Oscilloscopes can also be controlled by means of oscilloscope toolbars, located at the top of the window. Many settings are also accessible through hotkeys.
Control channels via a popup menu or settings window.
Oscilloscope settings and actions
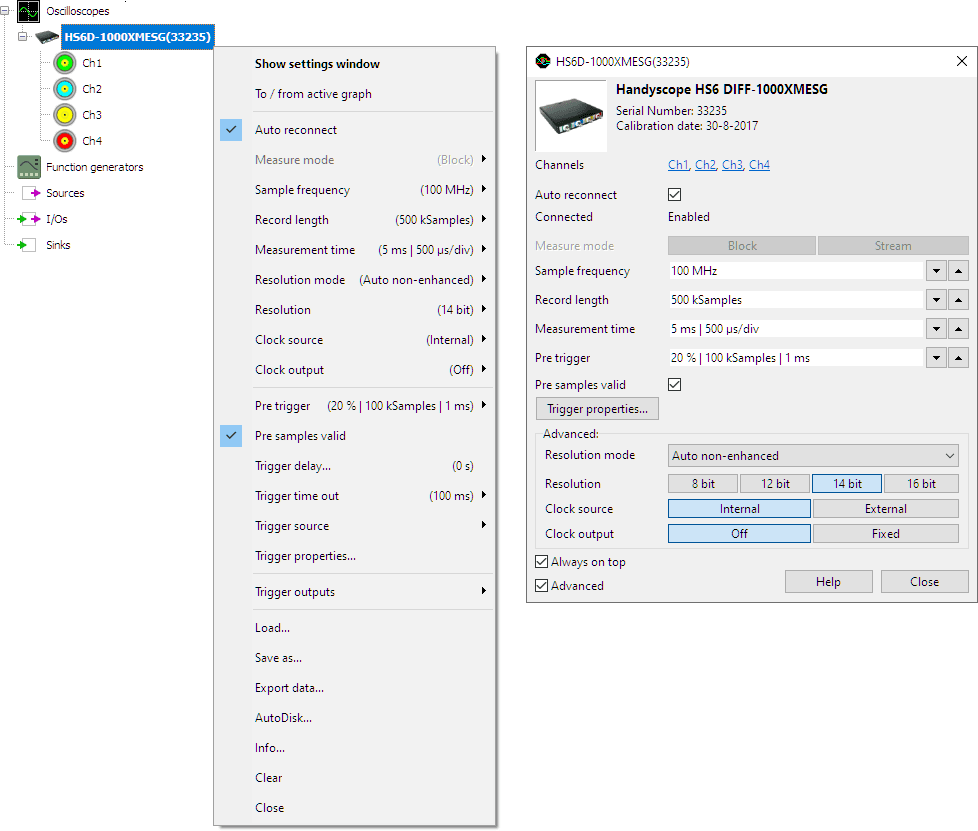
When the oscilloscope is right clicked, a popup menu is opened, showing all settings and actions which are available
for that oscilloscope.
Using the option Show settings window, a settings window is opened, which allows to changes all available settings.
The instrument properties can also be accessed through its settings window which is shown when the instrument is
double clicked or the
Settings window button on the instrument toolbar is clicked.
Not all settings and actions are available for each instrument.
To / from active graph
Clicking this item will add all channels of the oscilloscope to the active graph. When the active graph already contains one or more lines for the channels of this oscilloscope, they are removed from the graph.
Auto reconnect
When Auto reconnect is disabled and the instrument loses connection with the computer, the instrument is closed in the software and removed from the software. When connection is then established again, the software will notify a new instrument is available.
When Auto reconnect is enabled and the instrument loses connection with the computer, the instrument remains present in the software, but will be disabled. When connection is then established again, the instrument in the software will be enabled again and will resume performing measurements, using the same settings as before the connection was lost. Connected will indicate the connection status of the instrument.
Measure mode
This item opens a sub menu which allows to set the measure mode, between block mode and streaming mode. The measure mode can only be set when the oscilloscope is not measuring.
Sample frequency
This item opens a sub menu which allows to set the sample frequency of the oscilloscope . Hotkeys F3 and F4 can also be used to adjust the sample frequency.
Record length
This item opens a sub menu which allows to set the record length of the oscilloscope. Hotkeys F11 and F12 can also be used to adjust the record length.
Measurement time
This item opens a sub menu which allows to set the measurement time setting of the oscilloscope. A number of predefined values are available, as well a a User defined... setting.
Resolution mode
This item opens a sub menu which allows to set the resolution mode of the oscilloscope:
- Fixed: the resolution of the oscilloscope is fixed and will not be changed by the software.
- Auto non-enhanced: let the software change the resolution of the oscilloscope automatically to the highest possible value for the current sample frequency, using only the ADC's native resolutions and not the enhanced resolution(s) created by oversampling.
- Auto all: let the software change the resolution of the oscilloscope automatically to the highest possible value for the current sample frequency, including enhanced resolution(s) created by oversampling.
Resolution
This item opens a sub menu which allows to set the resolution of the oscilloscope.
Clock source
This item opens a sub menu which allows to set the sample clock source of the oscilloscope between internal and external. For information on the external clock requirements, refer to the Handyscope instrument manual.
Clock output
This item opens a sub menu which allows to select the clock output from the available options.
Pre trigger
This item opens a sub menu which allows to set the pre trigger / post trigger ratio. Hotkeys Shift + ← and Shift + → can also be used to change the pre / post trigger ratio.
Pre samples valid
This item determines whether of a measurement all Pre samples are valid or not.
Trigger delay
This item opens a sub menu which allows to set the trigger delay value.
Trigger time out
This item opens a sub menu which allows to set the trigger time out.
Trigger source
This item opens a sub menu which allows to set the trigger source.
Load
Use this item to load predefined oscilloscope settings and data from disk. The file format that is used is the TiePie TPS file format.
Save as
With this item the settings and optionally also measured data of an oscilloscope can be saved to a file. Other objects like graphs, other oscilloscope and I/Os etc. are not stored in this file. The file format that is used is the TiePie TPS file format.
Export data
With this item the measured data of an oscilloscope can be exported to a different file format, to use it in third party applications.
Auto Disk
This item opens the Auto disk function of the oscilloscope, which automatically saves each measurement to disk. The file format that is used is the TiePie TPS file format.
Info
This item shows hardware and driver specific information of the Handyscope. Items shown are:
- Name and model of the Handyscope
- Serial number
- Calibration date
- Firmware version
- Driver version
Clear
Use the Clear action to remove the measured data from all channels and fill them with 0 V.
Close
This item closes the oscilloscope. The oscilloscope is then removed from object tree, the oscilloscope toolbar and channel toolbars are removed and all connections to I/Os and sinks are disconnected.
To (re)open an oscilloscope, search it through the Search item in the Instruments menu or by hotkey Alt + S.
When the instrument includes a function generator, like the WiFiScope WS5, Handyscope HS5 or the Handyscope HS3, closing the oscilloscope does not close the generator. The generator is closed through its own popup menu.