The Handyscope(s) opened by the Multi Channel oscilloscope software can be controlled in different ways. The most convenient way is to control the oscilloscopes and their channels by means of the toolbars, shown at the top of the main window.
Oscilloscopes can also be controlled by means of popup menus and many settings are also accessible through hotkeys.
This page describes the Oscilloscope toolbar. For configuring the channels, visit the page about the Channel toolbar.
Hardware instruments (Handyscopes) have settings that are divided into two groups: Oscilloscope settings, that affect all channels of the Handyscope and Channel settings, which only influence a specific channel.
Using the oscilloscope toolbar
An oscilloscope toolbar is created for each detected Handyscope or WiFiScope. This convenient toolbar has large, clear, touchscreen friendly buttons for all oscilloscope settings. It shows the current settings of the oscilloscope and allows to change all settings.
The oscilloscope toolbar is fully configurable through the program settings. You can set the button size, add or remove buttons and change the order of the buttons.
When only one instrument is detected and opened, there is one single oscilloscope toolbar:

When multiple instruments are detected and opened, each instrument gets its own oscilloscope toolbar and channel toolbars. To save screen space, these are tabbed. Clicking the tab of a specific instrument will show the oscilloscope toolbar of that instrument and will also show the channel toolbars of that instrument.

In the default setup, the oscilloscope toolbar contains the following items:
Instrument settings dialog

Start/Stop button


Both actions can also be executed by hotkey S.
One shot button

Increase/decrease time/div
Two buttons are available to increase or decrease the time/div:


The steps that are taken are the time/div settings that are available in the time/div menu.
These buttons are particularly useful on touchscreens.
Time/div

Sample frequency

Record length

Increase/decrease pre samples percentage
The total record can be divided in a part before the trigger moment (pre trigger) and a part after the trigger moment (post trigger). The pre trigger part is set as percentage of the total record. Two buttons are available to increase or decrease the pre samples percentage:


These buttons are particularly useful on touchscreens.
Pre trigger percentage

Trigger source

Trigger settings

SureConnect connection test window

Additional buttons
Many more buttons and controls are available that can be placed on the instrument toolbar. Refer to the settings for more info.
Auto setup button

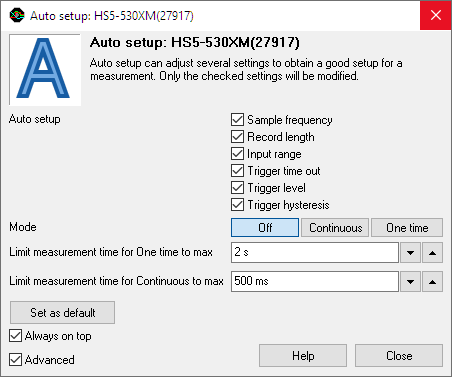
Clicking the Auto setup button opens the Auto setup window. In this window is determined which instrument settings can be adjusted by the software to get to the most useful setup for the connected signal. These setting are derived from the default settings which can be set in the program settings. For this particular measurements these settings can be altered and if required, they can also be set as default.
The Auto setup mode determines how the Auto setup is executed:
- One time the Auto setup is executed once, when the One time button is clicked.
- Continuous the auto setup is executed continuously, to make the required adjustments when the input signal changes.
- Off the Auto setup is switched off
Limit measurement time to max limits the maximum duration of a measurement that is setup by the auto setup function. The One time setting applies to a single Auto setup action, the Continuous setting applies to the continuous Auto setup mode. The setting avoids that the auto setup function will select a very slow setting when the signal is temporarily gone, e.g. when the probe is moved to another point.
Auto setup can also be activated by pressing the hotkey Q (quick auto setup). This activates the One time auto setup without showing the Auto setup window.
The hotkey Ctrl-Q activates the Continuous Auto setup without showing the Auto setup window. Pressing hotkey Q again switches Auto setup off again.
Measure mode button
The measure mode button can be used to switch between:


Switching the measure mode requires the Handyscope to be stopped measuring.
Increase/decrease sampling frequency
Two buttons are available to increase or decrease the sample frequency:


The steps that are taken are the sample frequencies that are available in the sample frequency menu of the oscilloscope. When a user defined sample frequency was selected, each subsequent click on one of these buttons will double or halve the sample frequency.
These buttons are particularly useful on touchscreens.
Increase/decrease record length
Two buttons are available to increase or decrease the record length:


The steps that are taken are the record lengths that are available in the record length menu of the oscilloscope. When a user defined record length was selected, each subsequent click on one of these buttons will double or half the record length.
These buttons are particularly useful on touchscreens.
Increase/decrease oscilloscope time resolution
Two buttons are available to increase or decrease the oscilloscope time resolution:


An oscilloscope measurement has a record length and a sample frequency. This gives a total measuring time. With each subsequent click on one of these buttons, the record length and sample frequency are respectively halved or doubled. The total measuring time remains equal, but the time resolution will decrease or increase.
These buttons are particularly useful on touchscreens.
Instrument identification
Record length + Sample frequency + Resolution

Time base

Time out + Trigger source

Pre samples knob

Resolution

Increase/decrease resolution
Two buttons are available to increase or decrease the resolution:


The steps that are taken are the resolutions that are available in the resolution menu of the oscilloscope.
These buttons are particularly useful on touchscreens.
Trigger now!

Predefined trigger time out settings
Three buttons are available to set the trigger time out:


Real-time SureConnect connection test
