Contents
Opening instruments
When the Multi Channel oscilloscope software is started, all locally connected supported instruments not in use by other applications will be detected. When only one instrument is found, it will be opened automatically.
When more supported instruments are detected, the Open instruments dialog is shown with the detected instruments. To open an instrument, place a check in the checkbox for that instrument. The checked instrument(s) will be opened when the dialog is closed using the OK button. Removing a check will close an already opened instrument.

The toolbar in the dialog gives access to additional functionality regarding selected instruments. Instruments can be slected by clicking them with the mouse, when more instruments need to be selected, keep the Ctrl pressed as well.
To update the list of detected instruments, the  Refresh button or function key F5 can be used.
To show detailed information of the selected instrument, click the
 Info button.
This will show a dialog with instrument name, serial number, calibration date, driver version etc.
Info button.
This will show a dialog with instrument name, serial number, calibration date, driver version etc.
Combining instruments
The software supports combining multiple instruments to a large combined instrument. When the instruments have a CMI interface, this combining is done automatically when the instruments are coupled to each other via the CMI interface when the software is started. Only the combined instrument will be listed in the dialog.
When the instruments do not have a CMI interface, combining them must be done manually.
To combine these instruments, select them by clicking them with the mouse having the Ctrl
key pressed.
Clicking the  Combine
button will then combine the instruments.
The instruments also need to be connected using a special cable, read more about manually combining
oscilloscopes.
Combine
button will then combine the instruments.
The instruments also need to be connected using a special cable, read more about manually combining
oscilloscopes.
When a manually combined instrument (consisting of instruments that do not have a CMI interface) is listed,
it can be split up into individual instruments again by selecting the combined instrument and clicking the
 Separate button.
Network instruments
WiFiScopes can be accessed via a network. The Multi Channel oscilloscope software can access, open and use the instrument from any location in the network.
To open a network instrument, enable Search instruments in the local network in the Manage instruments dialog. That will scan the local network for WiFiScopes. WiFiScopes that are in use by another application will be listed as In use by ... and can not be opened.
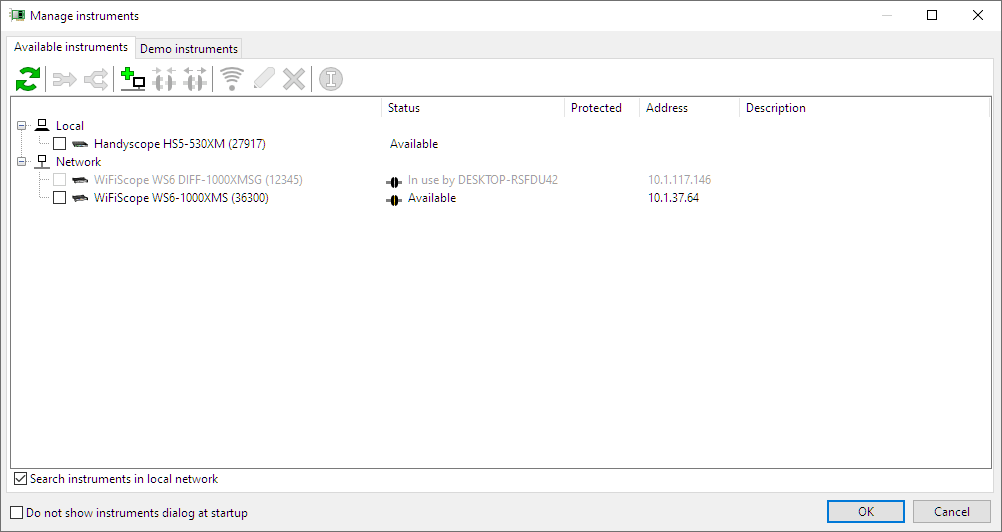
To open an instrument, place a check in the checkbox for that instrument. The checked instrument(s) will be opened when the dialog is closed using the OK button. Removing a check will close an already opened instrument.
The toolbar in the dialog gives access to additional functionality regarding the detected network instruments. Instrumenten are selected by clicking the with the mouse, when more instruments need to be selected, the Ctrl key must be pressed as well.
When a WiFiScope is not located in the local network, it will not show up in the dialog by default.
Use the  Add network location button to add its location to the list of searched network locations.
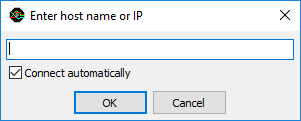
The network location can either be entered as IP address or as host name. When Connect automatically is checked, the Multi Channel oscilloscope software will automatically connect to the remote WiFiScope. The location will also be added to the list of used locations. Editing this list can be done via the program settings.
To connect to a listed but disconnected WiFiScope, select the WiFiScope by clicking it with the mouse and then click the
 Connect button.
The Multi Channel oscilloscope software will connect to the WiFiScope, but will not open it.
Connect button.
The Multi Channel oscilloscope software will connect to the WiFiScope, but will not open it.
To disconnect from a connected WiFiScope, select the WiFiScope by clicking it with the mouse and then click the
 Disconnect
button.
The Multi Channel oscilloscope software will disconnect from the WiFiScope.
If the WiFiScope was opened and in use, itwill be closed and no longer be used.
Disconnect
button.
The Multi Channel oscilloscope software will disconnect from the WiFiScope.
If the WiFiScope was opened and in use, itwill be closed and no longer be used.
When a WiFiScope is connected via the network, its web interface can be opened by selecting the WiFiScope and clicking
the  Setup WiFi
button.
This will open the web interface of the WiFiScope, allowing to make network settings changes.
Setup WiFi
button.
This will open the web interface of the WiFiScope, allowing to make network settings changes.
When the IP address or host name of a manually added WiFiScope network location has changed or was entered incorrect,
it can be edited by selecting that network location by clicking it with the mouse and then pressing the
 Edit button.
When a manually added network location is no longer required, it can be removed from the search list by selecting
it with the mouse and clicking the  Delete button.
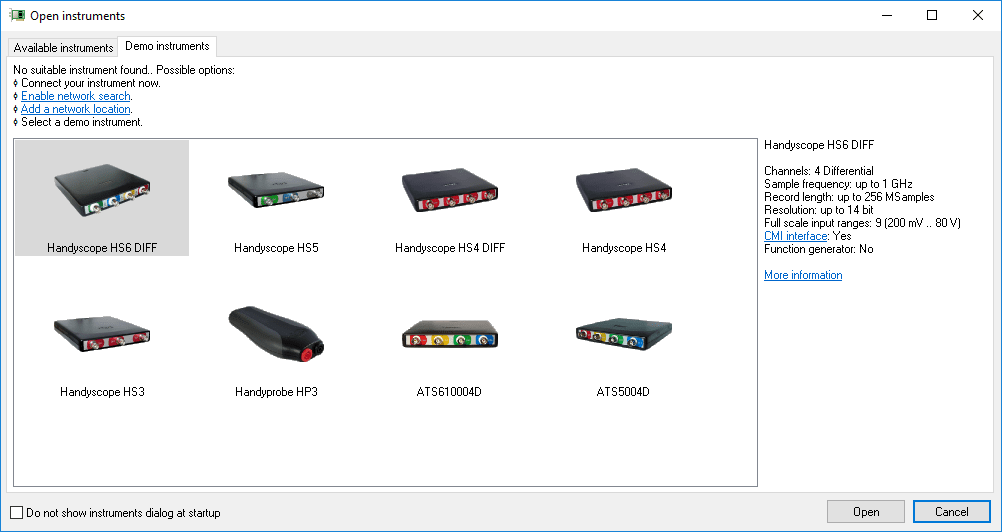
Demo instruments
When no supported instrument is detected, the Open instruments dialog is shown with a demo instrument selection, showing all available demo instruments and their key specifications. The required demo instrument can then be selected and will be opened when the dialog is closed using the OK button. The Multi Channel oscilloscope software then operates as demo software.
Controlling oscilloscopes
When more than one Handyscope is opened, one oscilloscope will be active, indicated by a blue and boldface name in the Object screen. Oscilloscope specific Hotkeys will apply to the active oscilloscope only. A different oscilloscope can be activated by clicking it in the object screen or by pressing the corresponding Hotkey.
Controlling oscilloscopes and channels can be done by means of toolbars. A fully configurable oscilloscope toolbar is available for each oscilloscope. For each channel also a fully configurable channel toolbar is available.
Controlling oscilloscopes can also be done by right-clicking the oscilloscope in the object screen. This will show an oscilloscope popup menu with all settings of that oscilloscope. Channels can be individually controlled by their channel popup menus which are opened by right clicking the channel in the object screen.
Read more about oscilloscope toolbars.
Read more about controlling instruments with popup menus and settings windows.
Read more about channel toolbars.
Read more about controlling channels with popup menus and settings windows.