Contents
- 1 Introduction
- 2 Used equipment
- 3 Setup the software
- 3.1 Converting the measured values
- 3.1.1 Set the gain
- 3.1.2 Set the offset
- 3.1.3 Set the unit of measure
- 3.1.4 Set the alias
- 3.2 Measure over a longer time
- 3.2.1 Setup streaming mode
- 3.2.2 Setup the time base
- 3.3 Reducing the data stream
- 3.4 Collecting the data
- 3.1 Converting the measured values
Introduction
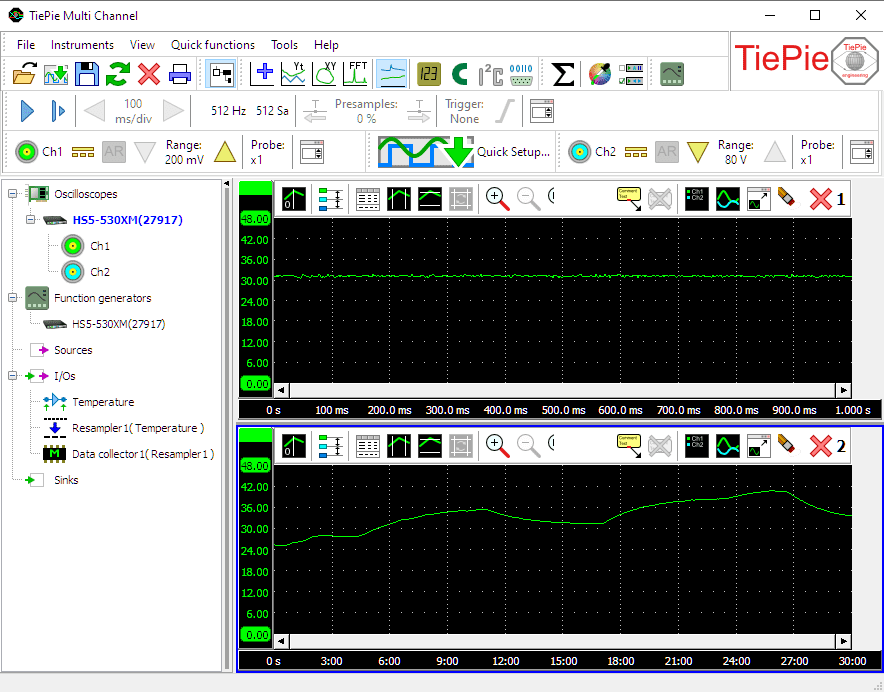
TiePie measuring instruments can be used to monitor slowly changing phenomenons over a longer time, like e.g. temperatures. This measurement example shows how the Multi Channel oscilloscope software can be used to measure temperature over a longer time and how it is configured to show the temperature directly, instead of a voltage.
Used equipment
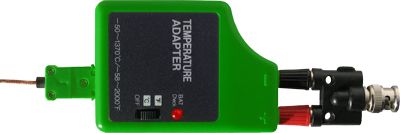
This example uses a Handyscope HS5 as measuring instrument. The Handyscope HS5 is designed to measure a voltage. In order to measure a temperature, a temperature sensor is required that converts temperature into a voltage that can be measured by the Handyscope HS5.
This example uses a PT100 temperature sensor and corresponding adapter, that converts the signal from the sensor into a usable voltage.
This sensor and adapter are not available from TiePie engineering.
Setup the software
The temperature adapter provides an interface between a temperature probe and the input of the measuring instrument. The specifications of the adapter state that the temperature range of the adapter runs from -40°C to +250°C. The output voltage range runs from -40 mV to +250 mV. This implies that for each °C temperature change, the output voltage changes 1 mV and when the temperature is 0°C, the output voltage is 0 mV.
Converting the measured values
When displaying the signal of the temperature adapter directly, the oscilloscope will display volts, not °C. To display the measured temperature with unit °C, the measured values need to be converted.
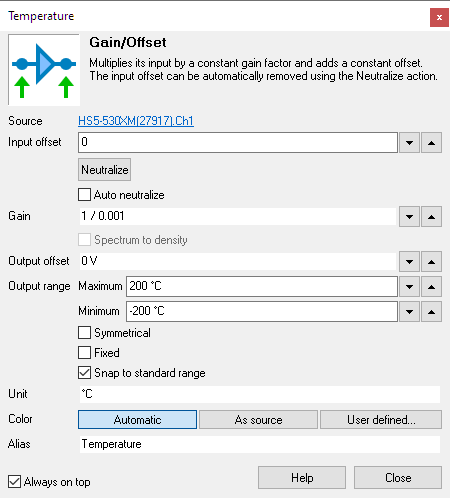
To convert the measured values, a Gain/Offset I/O is used.
First open the Object screen using the  Object screen button.
Then create the I/O by clicking on I/Os in the object screen and selecting Gain/Offset.
Drag Ch1 of the scope on the Gain/Offset I/O to connect the two to each other.
Finally double click the Gain/Offset I/O to open its settings window.
Object screen button.
Then create the I/O by clicking on I/Os in the object screen and selecting Gain/Offset.
Drag Ch1 of the scope on the Gain/Offset I/O to connect the two to each other.
Finally double click the Gain/Offset I/O to open its settings window.
Set the gain
As indicated before, the temperature adapter has an output sensitivity of 1mV/°C. To display the measured values directly in °C., they have to be multiplied by 1 / 0.001 = 1000. In the Gain/Offset settings window, enter the value in the Gain edit box. There is no need to calculate the proper value for the gain, the Gain/Offset I/O can do this by itself, so simply enter 1000, 1 / 0.001, 1/1m or 1k
Set the offset
In this example, the temperature adapter has an output voltage of 0 mV at 0°C, which means that no compensation is required here.
However, when the adapter would have a different output voltage at 0°C, this offset would have to be compensated. Suppose the output voltage at 0°C would be 500 mV, in that case the Gain/Offset I/O would have to compensate for this offset by subtracting 500 mV from all measured data. To achieve that, enter -500m in the Input offset edit box of the Gain/Offset settings window to compensate for the offset of +500 mV.
Set the unit of measure
The measured values are now converted to the proper range, but the oscilloscope still shows Volt and not °C. To change this, enter °C in the Unit edit box in the Gain/Offset settings window.
Set the alias
To simplify recognition of the various signals that can be displayed, it's possible to assign a name (alias) to an I/O. Enter Temperature in the Alias edit box of the Gain/Offset settings window.
The Gain/Offset I/O is now fully configured to convert the measured voltages to a temperature. Connect the temperature adapter to Ch1 of the Handyscope HS5. Then, in the software, connect Ch1 to the Gain/Offset I/O by dragging and dropping in the object screen.
Measure over a longer time
Measuring temperature changes usually involves a relative slow but long continuous measurement. To achieve this, a measurement in streaming mode is required.
In streaming mode, a continuous measurement is started. During this measurement, chunks of measured data are transferred to the computer periodically. These chunks of data are contiguous, there is no time gap between them. The software can then place these chunks after each other, combining them to one continuous large record of measured data.
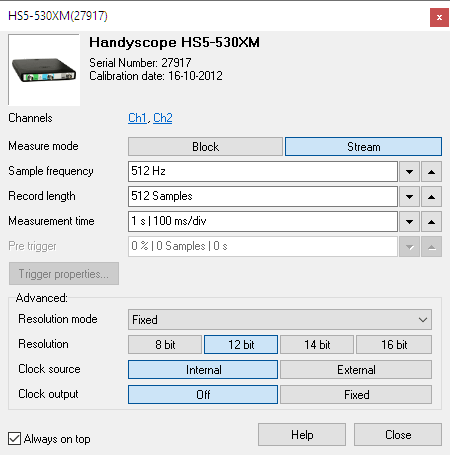
Open the Instrument settings window by double clicking the Handyscope HS5 in the object screen.
Setup streaming mode
To set the instrument to streaming mode, first make sure the instrument is not measuring by setting it to
pause using the  Stop button on the oscilloscope toolbar.
Then switch the Measure mode in the settings window to Stream.
When the instrument is started now, it will generate a continuous stream of uninterrupted data.
Stop button on the oscilloscope toolbar.
Then switch the Measure mode in the settings window to Stream.
When the instrument is started now, it will generate a continuous stream of uninterrupted data.
Setup the time base
In streaming mode, the instrument will sample at a predefined rate and each time when a certain amount of samples are measured, this chunk of data is transferred to the computer. Temperature measurements are relatively slow and therefore we do not need to measure very fast, one measurement per second is a suitable number.
In this example, the data chunk size is set to 512 samples and the sampling rate to 512 Hz. This gives one chunk of data per second. The data chunk size is controlled by the record length. It can be set by entering 512 in the Record length edit box in the instrument settings window. The sampling rate can be set by entering 512 in the Sample frequency edit box in the instrument settings window.
Reducing the data stream
We now get a chunk of 512 samples each second, which we want to reduce to one sample per second. The Resampler I/O can be used for that. Create a Resampler I/O by clicking I/Os in the object screen. Connect the Gain/Offset I/O to the Resampler I/O by dragging it on the Resampler I/O. Double click the Resampler I/O to open its setings window.
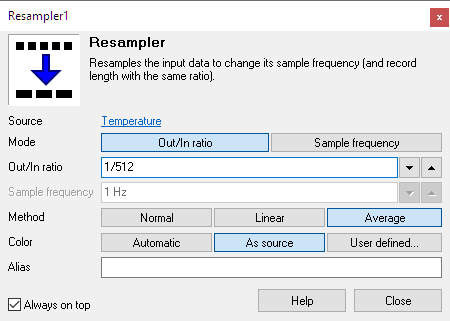
Set the resampling ratio
The resampler will have to reduce the data stream by a factor 512. In the Resampler settings window, select the Mode Out/In ration. Then enter 1/512 in the Out/In ratio edit box.
Set the resampling method
The Resampler has three methods for resampling the input data. In the Average method, the resampler takes the average value of all samples in the chunk and uses that for output value. This automatically gives low pass filtering on the data, reducing possible noise on the signal. To select the Average method, click the Method Average button in the settings window. We now have one temperature measurement per second.
Collecting the data
To collect all (reduced) data from the stream, create a Data collector I/O by clicking I/Os and selecting Data Collector. A data collector receives chunks of streaming data and "glues" them together, forming one large record of continuous data. Double click the new Data collector I/O to open its settings window.
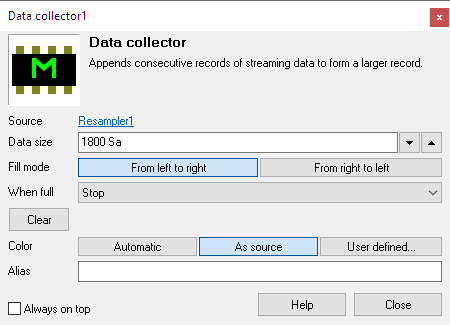
Connect the Resampler I/O to the data collector by dragging it onto the data collector. The amount of data a data collector can contain can be set, in our example we use 1800 samples, which corresponds to 30 minutes. Enter 1800 in the Data size edit box in the settings window.
Create a new graph and drag and drop the data collector on the new graph.