Contents
Introduction
With the Multi Channel oscilloscope software, you are not limited to number of channels of one oscilloscope. It is possible to combine and synchronize two or more oscilloscopes to form a combined synchronized instrument. Once the instruments are combined, the resulting single oscilloscope works just like a normal oscilloscope. There is no limit to the number of channels in a combined synchronized oscilloscope.
Depending on the used instruments, three different ways to combine and synchronize oscilloscopes are available:
Automatic combining using the CMI synchronization interface
Automatic combining and synchronization is possible with the following instruments:
- WiFiScope WS6 DIFF
- WiFiScope WS6
- WiFiScope WS5
- Handyscope HS6 DIFF
- Handyscope HS5
- Automotive Test Scope ATS610004DW-XMSG
- Automotive Test Scope ATS605004DW-XMS
- Automotive Test Scope ATS610004D-XMSG
- Automotive Test Scope ATS605004D-XMS
These instruments can be combined and synchronized in any combination of these instruments using their CMI synchronization interface.
View the multi instrument synchronization video
- WiFiScope WS6 DIFF
- WiFiScope WS6
- WiFiScope WS5
- Automotive Test Scope ATS610004DW-XMSG
- Automotive Test Scope ATS605004DW-XMS
Combining in hardware
Each individual WiFiScope and/or Handyscope is connected to the computer, using its own USB cable. The measuring systems of the individual instruments are coupled to each other by means of TP-C50H CMI Coupling cables which are placed on the AUX IO and/or CMI synchronization connectors of the instruments. Between each two instruments a TP-C50H CMI Coupling cable is used. When the instruments are combined using the TP-C50H CMI Coupling cable, they will share the same sampling clock and trigger signals, making it possible to perform fully synchronized measurements on all channels simultaneously.
Combining in software
Combining and synchronizing the instruments is done fully automatically. When the instruments are connected to the computer via their own USB cables and the TP-C50H CMI Coupling cables are connected to the AUX IO or CMI synchronization connectors of the instruments, the Multi Channel oscilloscope software can be started. It will automatically detect which instruments are connected to each other and combine and synchronize them to one larger combined instrument.
Adding an instrument to an existing combined instrument
Extra instruments can be added to an existing combined instrument. To add one or more CMI instruments to an existing combined instrument, close the software, connect the new instruments to the combined instrument using additional TP-C50H CMI Coupling cables and start the Multi Channel oscilloscope software again. The new, larger combined instrument will be detected and opened.
Removing an instrument from a combined instrument
To remove one or more CMI instruments from an existing combined instrument, close the software, disconnect the required instruments from the combined instrument and start the Multi Channel oscilloscope software again. The new, smaller combined instrument will be detected and opened.
Wireless combining using the Wireless Multi Instrument Synchronization Module WCMI
The Wireless Multi Instrument Synchronization Module WCMI is a module that allows to synchronize and combine two or more Handyscopes / WiFiScopes via an RF connection. The scopes can be up to 400 m apart from each other. Wireless combining and synchronization is possible with the following instruments:
- WiFiScope WS6 DIFF
- WiFiScope WS6
- WiFiScope WS5
- Handyscope HS6 DIFF
- Handyscope HS5
- Automotive Test Scope ATS610004DW-XMSG
- Automotive Test Scope ATS605004DW-XMS
- Automotive Test Scope ATS610004D-XMSG
- Automotive Test Scope ATS605004D-XMS
When WCMIs are placed on the extension connectors of the instruments, the instruments are synchronized via an RF connection between the modules. In the Multi Channel oscilloscope software the instruments can be combined to a large combined instrument. The accurate wireless RF connection between the modules will share the trigger signals, in order to start the combined scopes at exactly the same moment. The WCMI module has an internal automatic time synchronization system that takes care that all sample clocks of the oscilloscopes are synchronized. This allows to measure many signals simultaneously, using scopes that can be up to 400 m apart from each other. No long cabling is required between the scopes and the computer, which makes the setup very easy and hassle free. Per scope in the combined instrument, a WCMI is required.
Combining in hardware
Each individual instrument is connected to the computer, using its own USB cable, via LAN or via WiFi. Per scope in the combined instrument, a WCMI is required. Place the WCMI modules on the extension connectors of the WiFiScopes or Handyscopes.
Combining in software
When the instruments are connected to the computer using their own USB cables, via LAN or via WiFi, and the WCMI modules are connected to the extension connectors of the instruments, the Multi Channel oscilloscope software can be started. Initially, it will show the connected instruments individually.
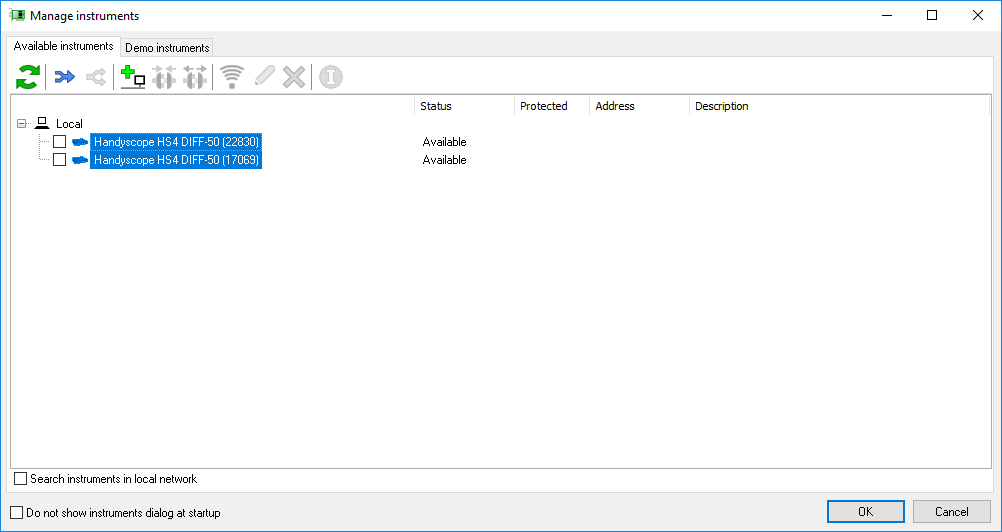
To combine the instruments, open the Manage instruments... dialog through the Instruments menu.
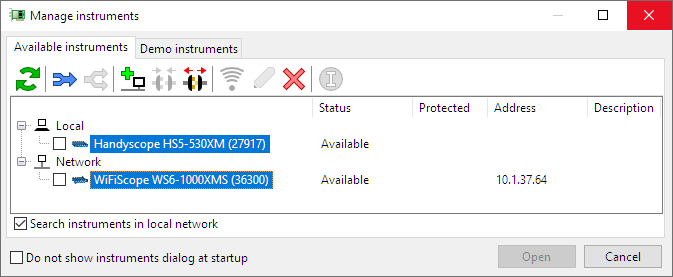
All connected instruments are listed in the dialog.
Select the instruments that need to be combined by clicking them with the mouse with the Ctrl key
pressed and then press the Combine button  .
You can now use the combined and synchronized instruments as if it was one large instrument.
.
You can now use the combined and synchronized instruments as if it was one large instrument.
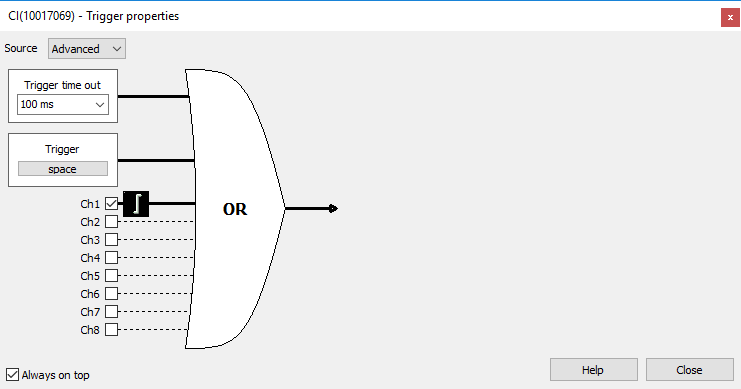
Each of the channels of the combined instrument can be selected as trigger source. Triggering on a combination of sources is only possible when all sources are located on one instrument in the combined instrument. It is not possible to trigger on a combination of sources from different instruments.
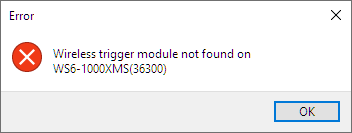
When an instrument without WCMI module connected is selected, or the module is not properly connected, combining will fail and an error is shown:
Clock synchronization
The WCMI module has an internal automatic time synchronization system that takes care that all sample
clocks of the oscilloscopes are synchronized.
After starting the Multi Channel oscilloscope software and starting continuous measurements, the modules will be synchronized in approximately 10 seconds.
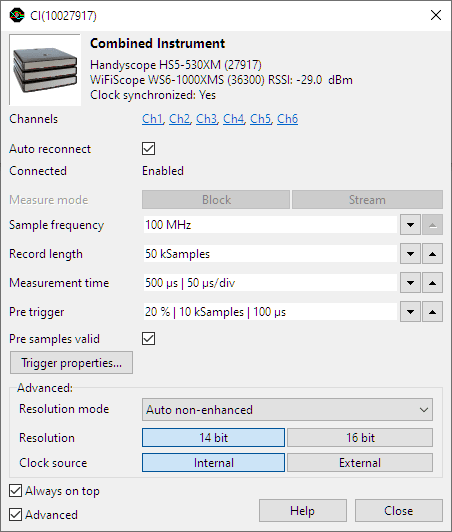
When the modules are synchronized, this is indicated in the
 Instrument settings window as Clocks synchronized: Yes, see image below.
Signal strengths
The WCMI module on the instrument that contains the trigger source will be transmitting trigger pulses. The module(s) on the other instrument(s) will be receiving the trigger pulses.
A Receiving Signal Strength Indication (RSSI) can be found in the Instrument settings window, showing the signal strength in dBm. In the image above, the Handyscope HS5 functions as trigger source, the WiFiScope WS6 receives the trigger signal, with a signal strength of -29 dBm.
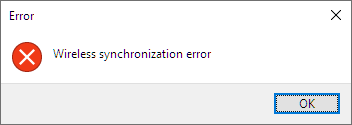
When the signal strength falls below -90 dBm, the connection can get lost, resulting in a notification message in the software and measurements to stop.
Reposition the instruments and/or remove blocking objects between the modules to improve the signal strength. It is also possible to disconnect the antenna from the module and connect an (external) antenna via a cable to optimize the antenna position and improve signal strength.
WiFiScope firmware upgrade
WiFiScopes that were produced and sold before the Wireless Multi Instrument Synchronization Module WCMI was introduced will require a firmware update, in order to support the WCMI modules.
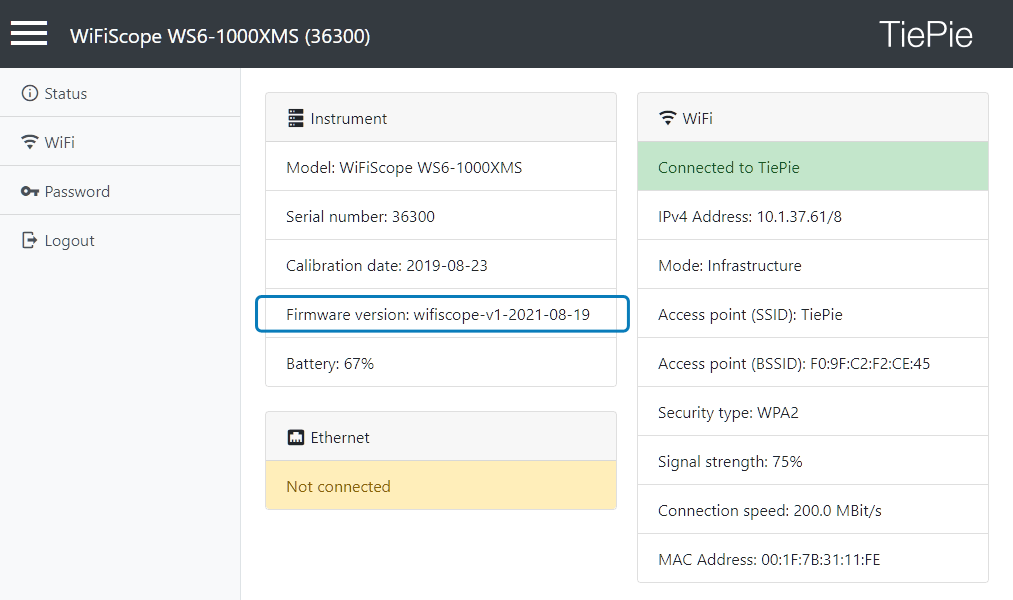
A firmware dated 2023-06-01 or later is required. The firmware version of the WiFiScope can be obtained on its status page in the web interface. Refer to the latest WiFiScope instrument manual (see the download page) to enter the web interface.
The required firmware image file can be downloaded from the download page on this website. The firmware update instructions are included in the instrument manual of the WiFiScope, which can be downloaded from the same page.
Handyscopes do not require a firmware update.
Adding an instrument to an existing combined instrument
Extra instruments can be added to an existing combined instrument.
To add an instrument to the combined instrument, first split the combined instrument in the software.
To split the instrument, open the Manage instruments dialog, select the combined instrument by clicking it with the
mouse and click the Separate button  .
Then connect the new instruments to the computer and install WCMI modules.
Refresh the content of the Manage instruments dialog using the Refresh button
.
Then connect the new instruments to the computer and install WCMI modules.
Refresh the content of the Manage instruments dialog using the Refresh button
 .
Finally select all instruments that need to be combined by clicking them with the mouse with the Ctrl
key pressed and then press the Combine button .
.
Finally select all instruments that need to be combined by clicking them with the mouse with the Ctrl
key pressed and then press the Combine button .
Removing an instrument from a combined instrument
When one or more instruments need to be removed from a combined instrument, first split the combined instrument in the software.
To split the instrument, open the Manage instruments dialog, select the combined instrument by clicking it with the
mouse and click the Separate button .
Then select all instruments that need to be combined by clicking them with the mouse with the Ctrl
key pressed and then press the Combine button .
Manual combining
Manual combining is possible with the following instruments:
- WiFiScope WS4 DIFF
- Handyscope HS4 DIFF
- Handyscope HS4
- Handyscope HS3 (from serial number 14266, older instruments need modification)
- Automotive Test Scope ATS5004DW
- Automotive Test Scope ATS5004D
These instruments can be combined in any combination of these instruments.
Combining in hardware
Each individual instrument is connected to the computer, using its own USB cable. The measuring systems of the individual instruments are coupled to each other by means of a special coupling cable which is placed on the extension connectors of the instruments. For more information regarding this special coupling cable, please contact TiePie engineering.
Combining in software
When the instruments are connected to the computer using their own USB cables and the special coupling cable is connected to the extension connectors of the instruments, the Multi Channel oscilloscope software can be started. Initially, it will show the connected instruments individually.
To combine the instruments, open the Manage instruments... dialog through the Instruments menu.
All connected instruments are listed in the dialog.
Select the instruments that need to be combined by clicking them with the mouse with the Ctrl key
pressed and then press the Combine button .
The selected instruments will be combined to one larger combined instrument.
All units in a combined instrument measure simultaneously: they are started at the same moment, stopped at the same moment and they respond to the same trigger. The units do however each use their own sample clock, that is not shared.
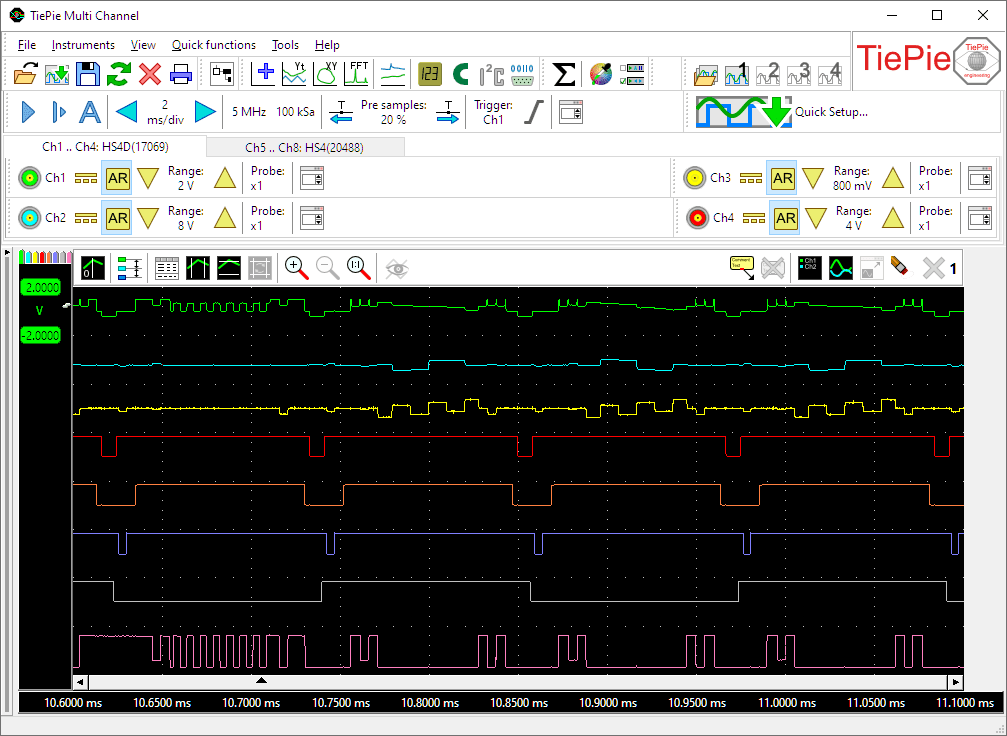
In the example above, two Handyscope HS4s are combined to an eight channel instrument. All eight channels can be measured simultaneously, both in block mode and in streaming mode. Any of the channels can be used as trigger source:
Adding an instrument to an existing combined instrument
Extra instruments can be added to an existing combined instrument.
To add an instrument to the combined instrument, first split the combined instrument in the software.
To split the instrument, open the Manage instruments dialog, select the combined instrument by clicking it with the
mouse and click the Separate button .
Then connect the extra instrument(s) with the instruments already contained in the combination,
by means of a coupling cable.
Refresh the content of the Manage instruments dialog using the Refresh button
.
Finally select all instruments that need to be combined by clicking them with the mouse with the Ctrl
key pressed and then press the Combine button .
Removing an instrument from a combined instrument
When one or more instruments need to be removed from a combined instrument, first split the combined instrument in
the software.
To split the instrument, open the Manage instruments dialog, select the combined instrument by clicking it with the
mouse and click the Separate button .
Then disconnect the instrument(s) that need to be removed from the combination.
Refresh the content of the Manage instruments dialog using the Refresh button
.
Finally select all instruments that need to be combined by clicking them with the mouse with the Ctrl
key pressed and then press the Combine button .
Restrictions
When multiple oscilloscopes with different maximum sampling frequencies or maximum record lengths are combined, the combined oscilloscope will have a maximum sampling frequency and record length equal to the lowest maximum frequency and record length of the oscilloscopes that are combined.